Do I Need to Flush My Hot Water Heater? Absolutely!Few modern luxuries rival the indulgence of a lengthy, steamy shower. Yet, amidst your relaxation, do you ever ponder the origins of that warm cascade? Are you aware that without proper maintenance, sedimentary deposits like rust may accumulate within your water heater, potentially compromising your bathing bliss? The water heater often falls into the category of household appliances taken for granted. Tucked away out of sight, it dutifully fulfills its function for years, sometimes without so much as a second thought. Typically, it only springs to mind when something goes amiss. However, like any appliance, water heaters demand regular upkeep to optimize energy efficiency and prolong their operational lifespan. A neglected unit might continue providing hot water for a time, but gradually, it will lead to escalating utility expenses and, ultimately, a complete breakdown. To safeguard your investment, it’s prudent to enlist the services of a licensed professional plumber for an annual inspection. A competent plumber will conduct a comprehensive assessment for rust, leaks, and other issues, examine the thermostat and valves, replace the anode rod to prevent corrosion, and, crucially, flush the tank. Yet, this final task—flushing the tank—might be one you consider undertaking yourself, perhaps every few months, depending on your local water's mineral content. Learning how to perform this maintenance chore can yield substantial savings over time, and it's surprisingly straightforward. Why should I flush my water tank periodically?Regularly flushing the lime and other sediments from your water heater tank is crucial for improving the heater’s efficiency and prolonging its lifespan. In neglected units, sediment can accumulate and solidify, posing significant challenges for removal. In severe cases, this buildup may necessitate the replacement of the entire water heating unit. However, by adhering to a regular flushing schedule, you can mitigate the risk of sediment-related problems. Every water source contains a certain level of mineral content. For instance, if you reside in an area abundant in limestone deposits, the groundwater is likely to absorb calcium and magnesium, resulting in the formation of "hard" water. Hard water generates sediment in the form of limescale, which gradually accumulates at the tank's base. In natural gas heaters, this can lead to uneven heating within the tank, potentially resulting in leaks over time. For electric heaters, scaling can cause damage to the lower heating element. Moreover, sediment buildup can obstruct the drain valve in both types of heaters. How can you identify sediment buildup? One telltale sign is a popping or rumbling sound emanating from the heater's tank, indicating steam bubbles struggling to rise through the sediment. Additionally, sediment can create hot spots on a gas water heater, posing a risk of tank damage and premature heater failure. When will I know my water heater needs a flush?Fortunately, the water supply to your water heater undergoes some degree of filtration before reaching your home. Otherwise, sediment would swiftly accumulate in your hot water tank, potentially unnoticed for years. Over time, you may start to notice a diminishing supply of hot water from the tank before it runs dry. If your water tank is easily accessible, you might observe sediment emerging from the drain valve, unless the sediment has already obstructed the valve. A word of caution: If you haven’t flushed your water heater in several years, it’s advisable to enlist the services of a licensed plumber. There’s a risk of inadvertently triggering leaks. It's plausible that the long-standing sediment has caused cracks in the tank's bottom. While the existing sediment may currently seal these cracks, draining and flushing the tank could dislodge the sediment, potentially exacerbating the leaks. We're not suggesting that you should avoid draining your tank altogether, nor are we implying that not flushing it for several years will inevitably result in a leak. However, by engaging a licensed plumber for the task, you’ll have the expertise at hand to address any potential leaks should they occur. Step 1: Turn off the water heater and water supply. Start by shutting off the cold-water supply valve connected to your water heater. You can find this valve on top of the water heater where the water pipe enters. For older homes, you might need to shut off the main water supply line. If your heater is gas-powered, switch the thermostat to pilot mode. For electric heaters, turn off the power at your home's electrical panel, making sure to identify the correct fuse or circuit breaker labeled for the water heater. It's a good idea to allow some time for the water in the tank to cool down as a precaution. Step 2: Connect a garden hose to the drain valve. Once the water heater has cooled, attach one end of a garden hose to the drain valve at the bottom of the heater. The other end of the hose should be placed in a floor drain or outside if possible. Step 3: Run hot water and open the drain valve. Open a hot water tap closest to the water heater to relieve pressure and help the tank drain faster. Then, open the drain valve to allow water to flow out of the tank. Depending on the amount of sediment or the tank's fullness, this may take some time. Step 4: Turn the water supply back on to flush the tank. While the drain valve remains open, turn the cold water supply back on to flush out any remaining sediment at the tank's bottom. Repeat this step until the water runs clear. Step 5: Close drain valve, fill tank, and turn on water heater. Once the tank is drained, close the drain valve and disconnect the garden hose. Ensure the cold-water supply valve is open to allow the tank to refill. Return to the hot water tap you opened earlier, wait for cold water to flow, and then turn it off. Finally, restore power to the water heater by turning on the gas for gas heaters or flipping the breaker for electric heaters. Check for any leaks at the valve, and you're all set. If your water heater requires it to always be full, refer to the manufacturer's instructions to avoid damaging the heating elements. If you encounter any operational issues, don't hesitate to reach out to us for assistance, and we'll send one of our technicians for an inspection. What if my tank won’t drain? If your tank is draining slowly or not at all, try opening the temperature/pressure relief valve located near the top of the tank. This valve typically has a lever that you can lift or lower, connected to a pipe extending down to the tank's base. Opening this valve could relieve any potential vacuum inside the tank that might be hindering drainage. If your tank is severely clogged with sediment, to the point where it's blocking the drain valve, it's wise to seek the expertise of a licensed plumber. They have the necessary tools and knowledge to address the issue effectively and safely. Don't hesitate to reach out to a professional plumber for assistance in this situation. What exactly are the benefits of draining your hot water tank?
0 Comments
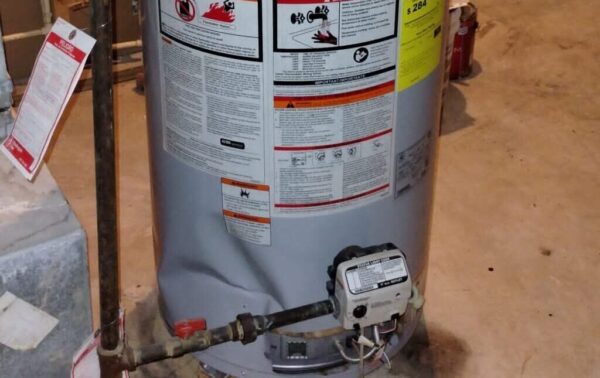
Your water heater is crafted to consistently heat water to a uniform temperature, eliminating the need for frequent adjustments. Nevertheless, there may be instances where you notice your water is either not sufficiently warm or excessively hot. Should this occur, here's a comprehensive guide on adjusting the temperature for various water heater models, along with recommendations on the ideal hot water temperature. What Temperature Should a Water Heater Be Set At?Most water heaters are engineered to function safely within the temperature range of 120 to 160 degrees Fahrenheit. Many tank-style units offer a low-temperature option, heating water to approximately 90 to 100 degrees Fahrenheit, which aids in energy conservation. However, it's imperative not to leave the unit at this setting when hot water is in use. Maintaining a minimum temperature of 120 degrees Fahrenheit within the tank is crucial to prevent the rapid growth of harmful bacteria, notably Legionella, responsible for Legionnaire’s disease, which thrives in warm water. Setting the water heater to at least 120 degrees ensures the water is sufficiently hot to eliminate bacteria. Although most units can be set as high as 160 degrees Fahrenheit, it's advisable not to exceed 140 degrees Fahrenheit to mitigate the risk of scalding. The EPA recommends a default setting of 120 degrees Fahrenheit to conserve energy and prevent scalding. Conversely, OSHA suggests setting the water heater to 140 degrees Fahrenheit for enhanced cleaning and sanitation purposes. Temperature settings between 120 and 140 degrees Fahrenheit are considered safe, allowing for personal preference. If there are young children in the household, setting the water heater to 120 degrees Fahrenheit is prudent to prevent scalding accidents. For households without young children or with older children, adjusting the temperature to 130 or 140 degrees Fahrenheit is typically recommended. Additionally, increasing the water heater temperature during winter months is advisable as colder water lines can cause a significant drop in hot water temperature during transit. Failing to adjust the water heater for winter conditions may result in insufficiently warm water at faucets and showers. How to Adjust the Temperature on a Gas Water HeaterIf you own a tank-style gas water heater, you'll find the temperature control knob positioned near the base of the unit. Adjusting the temperature on such a unit is a quick task, simply requiring you to turn the knob to increase or decrease the setting. However, the challenge lies in the fact that these units typically use numbers and symbols instead of indicating actual temperatures. Therefore, understanding the temperature corresponding to each setting is essential to avoid inadvertently setting the temperature too high or too low. Fortunately, these symbols are generally standardized across most units. The first setting beyond "Off" is typically labeled as "Low" or indicated by a solid circle, representing a temperature range between 90 and 100 degrees Fahrenheit. The subsequent setting, usually labeled as "Hot" or marked with a triangle, should correspond to 120 degrees Fahrenheit. Following that, you'll usually encounter three higher settings, denoted as 1, 2, and 3, or A, B, and C, corresponding to temperatures of 130, 140, and 150 degrees Fahrenheit, respectively. The highest setting, labeled as "Very Hot," corresponds to 160 degrees Fahrenheit. For older water heaters, there may also be a "Pilot" setting used for relighting the pilot light, although newer units typically utilize electronic igniters instead. Additionally, some units may feature a "Vacation" setting, which prevents energy wastage by keeping the unit off while you're away, although gas flow to the pilot light may still be maintained to keep it lit. How to Adjust the Temperature on an Electric Water HeaterModifying the temperature on a tank-style electric water heater follows a similar process to that of gas units. However, electric models typically conceal the temperature control behind an access panel situated near the unit's bottom. To access the control, you'll usually have to unscrew the panel cover and remove any insulation in the way. Subsequently, simply adjust the control knob to the desired temperature or corresponding symbol. After adjustment, remember to reinstall the insulation to prevent heat loss and energy inefficiency. How to Adjust the Temperature on a Tankless Water HeaterAdjusting the temperature on a tankless water heater is simpler compared to other types of units. This is facilitated by the presence of a digital display on most tankless models, indicating the current temperature setting. To raise or lower the water temperature, simply use the up or down arrows on the display until your desired temperature is shown. How to Measure Your Water TemperatureAll water heaters may encounter occasional issues leading to fluctuations in temperature, either higher or lower than normal. If you notice sudden changes in the temperature of your water, we advise measuring it to assess the heater's functionality.
To measure your hot water temperature accurately, begin by turning on the hot water faucet at a sink to its maximum setting. Allow the water to run for at least 30 seconds to ensure it reaches its peak temperature. Then, utilize a kitchen thermometer to gauge the temperature. If it differs from the set temperature on your water heater, it's prudent to have the unit inspected to identify the underlying cause of overheating or insufficient heating. At Meade’s Heating and Air, we offer comprehensive assistance for any water heater issues you encounter. Our services encompass repair and maintenance for all water heater models, including installation of both tankless and conventional units. Additionally, our team of certified technicians specializes in ductwork, indoor air quality services, and various heating and cooling solutions. If you require water heater or HVAC services in the Sterling area, don't hesitate to contact us today. Are you sick and weary of having to wait a long time for hot water to boil? The moment has come to think about switching to an electric water heater! Installing one isn't as hard as it seems, you might be surprised to hear; just follow our instructions to make the procedure easier. Electric water heaters are dependable, efficient, and always prepared to provide hot water when needed. Think of them as your own personal hot water factories. We'll make sure you have an easy time installing an electric water heater by taking you step-by-step through the process in this guide. We'll also go over the reasons Essco water heaters are an excellent option for the water heating requirements of both residential and commercial areas. How to install an electric water heaterHow to install an electric water heater
Step 1: Collect the Required Equipment and Suppliesassemble the necessary supplies and tools before starting the water heater installation process:
Step 2: Pick the Ideal SiteChoose a suitable spot for your electric water heater. It should have enough room for simple installation and maintenance, and it should be close to the electrical panel. Make sure the space is free of flammable objects and has adequate ventilation. Step 3: Cut the Water and Power OffWhen installing any electrical system, safety must come first. Cut the electricity to the existing water heater at the electrical panel. Likewise, turn off the water supply to the outdated water heater to avoid any leaks while it's being removed. Step4: Take Out the Antiquated Water HeaterRemove the old water heater's electrical wiring and water supply lines with caution. After releasing the fittings with the pipe wrench, take the old unit out of its place. Step 5: Installing the New Water HeaterMake sure the new electric water heater is positioned correctly in the designated area. Using a pipe wrench, attach the water supply lines and tighten the fittings. Look closely for any leaks of water. Keep in mind that only specialists should install the best water heaters. Step 6: Examine the Electrical LinkFor information on the precise electrical requirements for your Essco water heater, refer to the manufacturer's instructions. After stripping the wire ends with the wire stripper, attach them to the appropriate terminals on the water heater. Use wire connectors to firmly secure the connections. After finishing, switch on the electrical panel's power supply. Step 7: Put water in the heater and test it.To allow the air to escape from the water heater tank, open a hot water tap in your house. The tank is full when the faucet produces a steady stream of water. Inspect for any water leaks and, if required, tighten connections. Step 8: Adjust the ClimateTo suit your tastes, change the water heater's temperature setting. For safety and energy economy, it is advised to set the temperature at about 120°F (49°C). Step 9: Upkeep AdviceRegular maintenance will keep your water heater operating efficiently and extend its lifespan. Drain the tank on a regular basis to check for wear or leaks, examine the pressure release valve, and get rid of any sediment accumulation. Considerations for Purchasing a Water Heater:
Essco Water Heaters: Why Pick Them?
In summary:In summary, you can install your water heater with confidence now that you have this simple to follow advice. However, it's okay if you're not comfortable handling electrical devices! At the service center operated by Essco by Jaquar Group, you can always count on expert assistance. They'll guarantee a secure and appropriate installation of your heater. Whether you want to do it yourself or seek professional help, the most important thing is to ensure your comfort and happiness.
These days, a growing number of homeowners are learning how to do home renovation work themselves rather than hiring a professional due to the abundance of information available online. The do-it-yourself method has advantages, too, such cost savings. But occasionally, skimping on quality can end up costing you more. Only people with the necessary training and equipment, like a qualified plumber, should try many plumbing tasks, including installing a tank water heater. When installing a water heater on their own, homeowners frequently make mistakes. These include selecting the incorrect tank size, placing the unit in the wrong place, using the wrong materials, disregarding building standards, and more. Avoid these blunders when installing your water heater in a tank.Negative outcomes may ensue from installing a water heater without the necessary experience and expertise. For instance, it's critical to route the plumbing in a specific way, prevent combining metals, utilize high-quality soldering procedures, and select the appropriate type (and size) of pipes. Any error could result in a system failure, violate the equipment's warranty, or impair the water heater's functionality and efficiency. 6. Failing to get a permission or adhere to codes1. Selecting the incorrect sizeEven before it heats up the first gallon of water, your new water heater can be doomed to fail. There are 30 to 80 gallon tank water heaters available. The number of people living in your home and the amount of hot water used will determine the size you need. You will frequently run out of hot water if you get a water heater that is too small. On the other hand, by repeatedly heating water you don't need, a too large tank will cost you money each month on your energy costs. 2. Placing it in a hazardous areaThe location of your water heater is crucial for efficiency, convenience, and safety. Storage closets, attics, and subfloors are examples of places where installing a tank water heater may be restricted or forbidden, depending on your local rules. Since newer versions are wider and better insulated than earlier models, you cannot assume that the same position would work if you are replacing an old water heater. A qualified plumber will check that your water heater has enough space for airflow and appropriate access. 3. Failure to place a drain pan beneath the tankIt is advised—or mandated—that a tank water heater have a drain pan underneath it to catch any water leaks or discharges. The drain pan needs to be at least 1.5 inches tall and 2 inches broad, larger than the water heater's diameter, and constructed of materials resistant to corrosion. The likelihood of future water damage can rise if the drain pain is not installed or if the incorrect size is used. 4. The pressure relief valve is not configured correctly.In the event that the internal pressure or temperature rises too high, the pressure relief valve acts as a safety mechanism and discharges water from the tank. Your water heater could burst or possibly explode if the release tube and valve are not installed correctly. 5. Inadequate connections and material choicesNegative outcomes may ensue from installing a water heater without the necessary experience and expertise. For instance, it's critical to route the plumbing in a specific way, prevent combining metals, utilize high-quality soldering procedures, and select the appropriate type (and size) of pipes. Any error could result in a system failure, violate the equipment's warranty, or impair the water heater's functionality and efficiency. 6. Failing to get a permission or adhere to codesHomeowners who undertake do-it-yourself projects frequently believe they are free from construction codes and permits, but this is untrue. There's a reason these guidelines are in place, and ignoring them can have costly and dangerous consequences. A trustworthy plumber will guarantee that your water heater installation is completed exactly as written.
The average individual uses hot or warm water up to twenty times a day, did you know that? We all depend on hot water that is consistently available for cooking, cleaning, and taking baths. Most people don't give their workhorse appliances much thought until they break down or leak, making them a liability in the house. This article will provide you with all the information you need to install a new water heater if your current one is beyond repair. It covers the overall cost, your options for equipment, and the situations in which replacing the unit makes more sense than repairing it. When To Replace A Water Heater That BreaksThe majority of electric and gas water heaters have a 12-year lifespan when properly maintained. Nonetheless, tankless versions frequently last 20 years or longer. It's normal for your water heater to require more maintenance as it gets older, which is a dead giveaway that it needs to be replaced soon. These are some telltale indicators that it's time for a water heater replacement, even though yearly maintenance helps extend its lifespan.
What Is The Price Of A New Water Heater Replacement?The average cost, including labor, to install a new conventional water heater in the Marietta area is between $800 and $2,000 or more. Since installing a tankless water heater usually requires extra labor, the cost can reach $4,000. The estimate may potentially increase depending on the tankless model. The following variables affect how much it costs to replace a water heater:
A modern water heater should take into account various factors, including recovery rate, energy efficiency, and lifetime operating costs. For example, compared to electric models, a gas water heater recovers hot water faster and has lower lifetime expenses; nevertheless, electric water heaters are significantly more energy-efficient. Given that water heaters are the home's second-highest energy user, this can have a significant influence on the equipment you select. I Want to Install a New Water Heater, Can I Do It Myself?Although it is feasible, most experts wouldn't advise doing your own installation of a new water heater.
Gas lines need to be connected appropriately, and natural gas water heaters need to be properly vented. Even the smallest error could result in a hazardous or fatal situation. If you go from an electric water heater to a natural gas water heater, you will need to install venting pipes and a gas line for the water heater to operate properly. Depending on the type of unit you buy, you might want a specialist with knowledge of gas piping, water lines, discharge pipes, gas control valves, pressure relief valves, shutdown valves, drain valves, etc. It takes more than just turning on a circuit breaker and plugging in a new appliance to complete this installation. |
AuthorWrite something about yourself. No need to be fancy, just an overview. Archives
June 2024
Categories
All
|
Local Service AreasAnnandale, VA
Fairfax, VA North Springfield, VA West Falls Church, VA Burke, VA Falls Church, VA Hours of Operation Monday - 9:00 AM - 6:00 PM Tuesday - 9:00 AM - 6:00 PM Wednesday - 9:00 AM - 6:00 PM Thursday - 9:00 AM - 6:00 PM Friday - 9:00 AM - 6:00 PM Saturday - 9:00 AM - 6:00 PM Sunday - Close |
Navigation |
ServicesAC Unit Replacement
AC Unit Repair Furnace Repair AC Maintenance Emergency AC Service Commercial Rooftop Unit Commercial AC Maintenance Apartment AC Repair Commercial HVAC Installation Water Heater Repair Air Quality Service Air Conditioning Repair Air Conditioning Maintenance Air Conditioning Installation Air Conditioning Replacement Air Conditioning Components Heating System Repair Heating Installation Heating System Maintenance Boiler Services Furnace Repair Heat Pump Repair |
Contact usAC Repair Annandale
3906 Millcreek Dr. Annandale, VA 22003 (571) 999-7227 |

 RSS Feed
